
Common Tile Flooring Installation Methods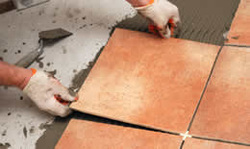
There are seven primary steps to installing floor tile:
1. Subfloor preparation is very important as you want to make sure that there is no structural movement, surface is flat, clean and that there is no squeaking. Therefore we prepare the floors by removing any staples and adding screws to stop any squeaking in the floor. 2. Backer board is next installed on top of the subfloor (unless the floor is concrete) to help with structural movement and moisture. This also provides a good, clean, bonding surface for the tiles. The backer board will not warp, rot, swell, or deteriorate. 3. Floor layout is a very important step because you want to make sure that when you install the tiles, the cut tile size is symmetrical at each opposite end of the room. However, this varies if the room is not square or if a multiple tile pattern is used. Once the layout is complete, starting lines are marked. 4. Spreading the thin-set: Once your layout is determined and starting lines marked on the floor, you begin applying the thin-set. Thin-set is spread in small sections with a notched trowel over the backer board. 5. Laying the tiles: The tiles are placed one at a time and set down with slight pressure over the thin-set mixture. Tiles are separated with spacers to ensure identical separation. The thin-set is then left for 24 hours to dry. 6. Grouting can typically be done the following day. Grout is spread in small sections with a float. It is important to fill the grout joints completely. The excess grout is then wiped off the tile with a damp sponge. A haze will be left behind. Grout is then left for 24 hours to dry. 7. Sealing the tile can typically be done the following day. The tile is wiped down with a damp rag to remove the grout haze and any dirt. The sealer is then spread over the tiles with a sponge, left to sit for a few minutes, and then wiped clean. |

|
We offer FREE ESTIMATESRJA Floors provides dependable service and quality craftsmanship. Contact us today to schedule a FREE consultation and estimate!
Tile Flooring: |


CLIENT TESTIMONIALS - see what our previous customers have to say about their experience with RJA Floors!
|

DISCOUNTS & PROMOTIONS - View the current special discounts and offers from RJA Floors!
|

FREE ESTIMATES - LET'S TALK! Contact us today for a FREE, no obligation estimate! Our courteous staff is readily available to serve you.
|
|
Can't find what you are looking for? Search our site!
|
|
- Like our website? Contact the Web Designer
