
Tongue & Groove Installation Process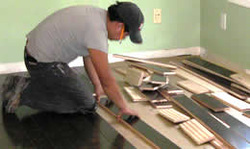
There are 5 basic steps to installing hardwood floors:
1. Subfloor Preparation – Subfloor preparation is very important as you want to make sure that there is no structural movement, surface is flat, clean and that there is no squeaking. 2. Floor Layout – The direction the hardwood is laid down is based on some factors or preferences. Sometimes the hardwood can be laid best in the direction you typically walk through a room to make the room look longer and larger. Many times it is laid down parallel to the direction of light through windows, to minimize the reflection woods beveled edges. Once the direction is determined, a chalk line ¼-inch away from the wall will be snapped for your straight starting line. A gap is left all the way around the room to give the hardwood room to expand with variation in room temperature. 3. Moisture Barrier – Before installation of the hardwood, a moisture barrier is placed over the entire subfloor to eliminate any moisture getting in contact with your hardwood causing it to bend or bow. 4. Hardwood Install – The first row is installed along the chalk line. The remaining rows are laid down making sure to stagger board edges by approximately a foot. Each board shall be tapped in tight with a rubber mallet and stapled or nailed in. This step will continue until we've reached the other side of the room. 5. Shoe Molding – Last, the shoe molding is installed along the wall to cover up the ¼-inch gap that was left for wood expansion. Also, all doorway thresholds shall be installed at this time. |

|
We offer FREE ESTIMATESRJA Floors provides dependable service and quality craftsmanship. Contact us today to schedule a FREE consultation and estimate!
Hardwood Flooring: |


CLIENT TESTIMONIALS - see what our previous customers have to say about their experience with RJA Floors!
|

DISCOUNTS & PROMOTIONS - View the current special discounts and offers from RJA Floors!
|

FREE ESTIMATES - LET'S TALK! Contact us today for a FREE, no obligation estimate! Our courteous staff is readily available to serve you.
|
|
Can't find what you are looking for? Search our site!
|
|
- Like our website? Contact the Web Designer
